Pages

Sunday, March 24, 2013

The glam girl's room - the bed

As part of the new room makeover I knew we would be buying a new bed.

My daughter had a loft bunk bed before we moved into the new house.  She chose to sleep on her twin mattress on the floor rather than moving her bunk bed into the new room -- nothing makes you feel like a good parent like having your kid sleep on a mattress on the floor :-)

We quickly got her a new box spring and a bed frame, but we had to find just the right bed for the room.  I searched local furniture stores and online sites trying to find the right bed -- and one that was in my budget.

Then, while we were out browsing some local antique stores for decorating ideas and accessories (I'm fortunate to live in an area where there are several nearby), I found it!  It was sitting on the front porch of The Cottage.

The antique bed had already been painted and distressed, but it was a little too shabby -
some of the paint starting peeling off (when I picked and peeled at it :-)


Someone had already tried to give it a Shabby Chic finish but it was waaaay to shabby for a girls bedroom - also, while the color was nice, it didn't fit into our color scheme.  I decided I would refinish the bed to give it a more girly, less shabby, shabby chic finish.
 

So, I started my first Annie Sloan Chalk Paint project using Old White paint.

My youngest daughter and
good friend Melissa -- All pitching it :-)


I loved how smooth the Annie Sloan Chalk Paint went on and how smoothly and easily is sanded down while distressing.


I finished the bed with a coat of clear furniture wax.  I decided not to buy the Annie Sloan wax, but on all my projects since this one have used only Annie Sloan Wax. The others seem to have a slightly yellow tint and change the beautiful color of the 'Old White' paint.

Stay tuned for the posting with the completed bed and the finished Glam Girl Room Makeover.

The glam girl's room - the chandelier

Is it possible to have a super glam girls room without a chandelier?

I wasn't sure what I was going to do about lighting until I came across this ultra-fabulous chandelier on my favorite online garage sale - I wasn't even looking for this, but once I saw it I was inspired!

The arms look kind of crooked in this pic, but where they connect
they could twist a bit -- a slight adjustment and it was totally straight.

My favorite part about this chandelier (besides the multi-tiered lighting and the beautiful shades) is that it was used to light the tent during the reception of a civil ceremony. Although I don't know where it first came from, it has more history than something straight off the shelves of a hardware super store.  I like that it has a happy past :-)

It needed just a few minor adjustments to make it fit in with the new room decor. For one, the brass would not match all the gray and silver accents. So, I decided to paint all the brass on the chandelier. I decided on Rust-Oleum Metallic Satin Nickel Spray Paint.


Once it dried, we called the electrician to mount it -- in the new house there wasn't lighting pre-installed in the bedroom ceilings, otherwise we would have hung it ourselves.  One thing I highly recommend is to go with a dimmer switch -- when on at full brightness the light is very bright and kicks off some serious heat.

I bought the decorative surround to mount with the chandelier. I thought it would add a nice touch. If I had it to do over I might have painted the surround - sometime I think you can look and tell it's plastic, but overall I'm pretty happy with it.


Now, about those shades..... I knew I did not want to leave them the ivory color but I wasn't sure what I could do with them.  I considered buying new shades, but at $5-10 each that would have added significantly to my budget.  I was going to try and paint them. 

I had never painted fabric before and I wasn't sure what to do that wouldn't mess them up - I was afraid painting them would leave them with a hard, plastic look.  And if I messed one up I was sc$%^$^ed -- I didn't have any 'spares'.

So I researched what others had done.  I thought maybe acrylic craft paint; I saw that on one of the blogs, but realized that it was a much different chandelier shade they refinished - the ones I had were fabric on the inside and out.

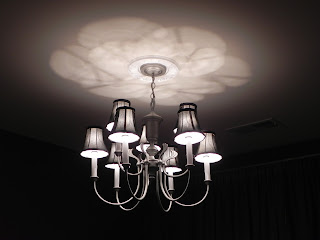
I decided to go for it with some flat black spray paint. I laid them all out on a sheet of cardboard and started at it.  I was sooo pleasantly surprised! The paint went on nicely -- the key was doing VERY light coats of paint. I think I did 2-3 coats, but very light each time. The finished product was not stiff or plastic looking at all.


I LOVE the way this turned out. I especially love the way the shades cast the light -- it is such a romantic feeling and adds so much to the charm of the room. 

This turned out to be one of the highlights of the room, and everyone that sees it oohs and aahs.