Pages

Saturday, January 25, 2014

Meant for each other - The tale of the dresser and the mirror

When I was searching for Alexis' dresser, I somehow ended up with two dressers. (This was early in my craigslist addiction days, before I had it under control -- haha, like I have it under control now ?!?!)  So, this dresser sat in the basement for months before I got motivated enough to tackle it. Now that it's finished, I must say, it is absolutely beautiful!

Like so many of my projects, I forgot to take a good "before" picture, so here it is in pieces.


bassett-dovetail-drawers-dresser-wood-before-annie-sloan


As you can see, it has great curves, dovetail drawers, pretty details and ornate french provincial style handles. As you may also notice, I did this entire project in the basement hallway!

Since this was an 'extra' dresser, I had no planned place for it, but once it was finished I had to give it a home. She ended up in the dining room as a buffet. 

Then.... I found this gold mirror at an estate sale and I new they were meant to be together. 


I painted the mirror and it was a match made in heaven.


She's still in my dining room, but I can't wait to find her a home where the dresser and mirror can live happily ever after :-)

Wednesday, November 20, 2013

The not quite so black bench

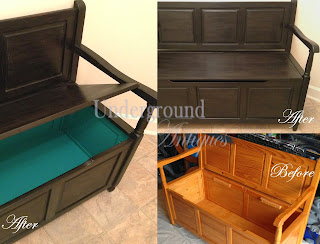
So time got away from me I suppose :-)  I'm back and I would like to share this pine bench I refinished for the entryway.  This was my first attempt at using Annie Sloan's graphite chalk paint.  If you're not familiar with Annie Sloan Chalk Paint one of the common complaints is the lack of a true black. The closest thing Annie Sloan has to black is called graphite, and it is definitely gray and not black.  There are two ways suggested to achieve the look of black with Annie Sloan: 1.) Use Annie Sloan Dark Wax on top of Graphite; 2.) Add a black tint (acrylic craft paint, India Ink, etc.) directly to the paint.  This bench was my first attempt at using graphite with the dark wax to get a 'black' piece.

In the new house, the front door is right near the stairs. So coming and going everyone sits on the stairs to put on their shoes. I thought, wouldn't it be nice to have a bench here :-).

I found this really cute bench that even offered some storage.  You can see, like always, I forgot to take a before picture until after I had already started.

This was not only my first time trying graphite with dark wax, it was my first time using dark wax at all.  I wasn't sure what exactly it was supposed to look like. I was putting it on and when I tried to remove the excess most of the wax was coming off and it still did not look black. So my answer?  You guessed it....add more wax.


Since then, I have learned that sometimes less is more and that I will just not get the black I was looking for with this technique.  I do love how this bench turned out, though. Not what I expected, but I do love it.


And leave it to the BF to come up with brilliant ideas.  He is the one that suggested painting the inside with Annie Sloan Chalk Paint in Florence.  It adds such a fun element without being overwhelming!


Saturday, May 11, 2013

I think I need an intervention...

So I went on a binge this weekend.  I think the only reason I was able to get away with it is because it's mother's day weekend.

Check out my great finds.......

Any suggestions on how I should finish them??

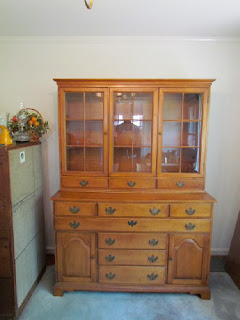
china cabinet hutch and buffet with brass handle drawer pulls and glass cabinet doors
China Cabinet Hutch and Buffet.
I'm not sure if I'm going to leave this together or sell the buffet and use the hutch as a cabinet. Looking at it her it may seem like an odd idea, but when I took them apart to transport them, I thought the hutch looked like a piece I've been looking for to put in the downstairs hallway, and if I sell the buffet for what I bought the entire piece for....well that would mean a beautiful FREE cabinet........we'll see. 

antique desk with brass handle drawer pulls before paint refinish
Antique Desk

This desk is beautiful! (I mean once you clear away those cob webs :-))

I have been wanting a desk like this so BAD! I stumbled across it quite by accident, and I won't even tell you what I paid for it --- not a lot! I haven't decided exactly how to refinish it yet -- maybe paint it, maybe strip it and re-stain it --- ok, I'll probably paint it. But what color??


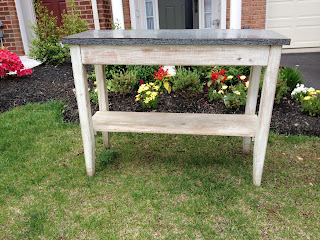
white washed side table with shelf and laminate top
White washed side table with laminate top -- potting table?


This was just $5, so I couldn't resist. I think I'll keep the white washed look but give it a fresh coat and replace the top. This will be my first time doing a white wash finish and first time replacing a tabletop.

gold framed wall mirror
Gold framed mirror
 I had in mind for this to go in our entry way after I paint the frame. I may end up reselling this one....


maple nightstand with drawer and spindle legs and brass handle pull
Maple night stand

I know exactly what I'm doing with this one. It is getting painted with Annie Sloan's Old White to match Alexis' bed. It will be going right into her room as her new nightstand.


I guess I've got my entire summer project list lined up. 

Any suggestions on how to re-finish them?


Monday, April 29, 2013

My first free find...


While I was researching how to refinished my daughter's dresser, I came across this blog by Shaunna West, PerfectlyImperfect. I was truly inspired! One of her projects was an old buffet that she had refinished and was using as a console table. At the time, my TV was sitting on a half falling apart particle board piece of furniture, so this became my next project.

I found this dresser on Craigslist for FREE!! That is, if you count carrying it down three flights of stairs free :-)

Even after the bedroom makeover my BF was still not convinced that this was a worthwhile endeavor.  This project has forever changed his mind. 

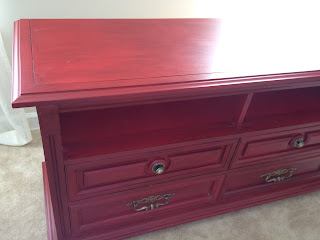
Dresser converted to TV Console using Annie Sloan Chalk Paint Emperor's Silk with Dark Wax
This was the free dresser before I painted it.

Dresser converted to TV Console using Annie Sloan Chalk Paint Emperor's Silk with Dark Wax

 This is another before picture of the dresser that was to be transformed.
You can see the rough shape it was in.

Dresser converted to TV Console using Annie Sloan Chalk Paint Emperor's Silk with Dark Wax
 I gave just a very light sanding to the surfaces.


After everything was lightly sanded and wiped down, I got out the paint.
I went with the brightest color I could find. Annie Sloan Chalk Paint in Emperor's Silk.
A bright Red!

This is after two coats of Annie Sloan Emperor's Silk. I liked the way you could still see some of the wood grain come through. I hadn't really expected that, although I read that was often the case with with this kind of wood.  

I was very tempted to leave it this bright color. I thought it looked great. But as I've heard it said, you can't really go wrong; you can try different things and see how they turn out. 

I'm glad I went with the more subdued look of the dark wax
on top of the Annie Sloan Emperor's Silk.

Dresser converted to TV Console using Annie Sloan Chalk Paint Emperor's Silk with Dark Wax
Close up after adding dark wax on Annie Sloan Emperor's Silk


I like the picture above because it really shows how the dark wax settles in to all the little grooves of the wood. 


Dresser converted to TV Console using Annie Sloan Chalk Paint Emperor's Silk with Dark Wax
Here is one drawer after the dark wax and one drawer before the dark wax

This was my first project using the dark wax and I will say that it took a little getting used to, and it was a bit more work than I anticipated.  Unlike the clear wax you have to be more careful in applying it evenly on various parts and pieces of your project.  Some parts ended up a little darker than others, but I say it adds to the charm.


Dresser converted to TV Console using Annie Sloan Chalk Paint Emperor's Silk with Dark Wax

After getting it painted,  I removed the two top drawers, painted the inside red, and drilled a small whole in the back for wires. My TV now sites on top with the cable box, DVD player, and video games where the top drawers used to be.  The bottom drawers are just the right size to house all our DVDs.


The previous particle board TV stand made it to the dump :-(


Friday, April 5, 2013

The glam girl's room makeover

When my daughter left town for the summer, we promised her she would return to a brand new bedroom -- she completely trusted us to give her a new grown up bedroom makeover!

When we bought our new house we had beige everything!  So her bedroom was a blank canvas. It had builder white walls, beige carpet, white slat blinds that we put up the week we moved in (It's one of those things we didn't even think before we moved in. When you buy a brand new house there are NO window treatments when you move in!)


Here is the list of  things we new we would have to include in the makeover:
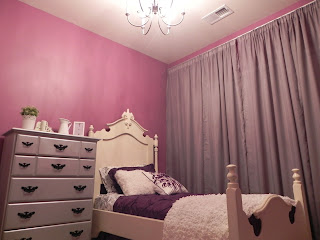
  1. Paint: We had to choose a color that was grown up, girly and sophisticated
  2. Lighting: The house didn't come with any ceiling light and her old light would just not fit in to the new room (See the chandelier refinish project)
  3. Curtains: We had put up 2" slat blinds, but she would definitely need curtains
  4. Shelves or Storage: Her old bookcase had to go. She would definitely need some new storage
  5. Furniture (Bed & Dresser): In the old house she had a bunk bed and when we moved she didn't want it going in the new room. So she had just the twin mattress on a boxspring and a frame.  (See the bed makeover project) And the dresser was a second hand dark wood old dresser (See the dresser makeover
1. Paint

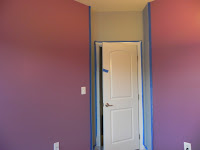
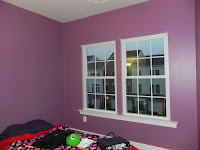
The paint was surprisingly easy to pick out. We found a beautiful color that was somewhere in the middle between purple and pink. And the BF had a great idea to add a small accent color around the wall with door. We went with Glidden Rosy Mauve.

girls bedroom makeover Glidden Rosy Mauve paint colorgirls bedroom makeover Glidden Rosy Mauve paint color

2. Lighting

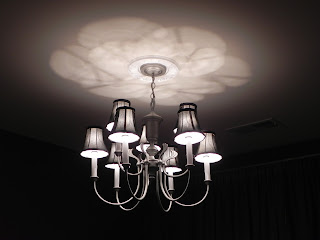
What is a super glam room without a chandelier? While browsing my favorite online garage sale I found a beautiful chandelier that just needed a few changes to fit perfectly into the room. A little spray paint made the brass chandelier a very romantic and charming addition to the room.
Check out the chandelier makeover.  

brass chandelier with lamp shades refinsihed with metallic satin nickel spray paintbrass chandelier with lamp shades refinsihed with metallic satin nickel spray paint


3. Curtains

We had already chosen gray/silver as the main accent color and I wanted the curtains to make a dramatic statement.  Well, these did exactly that and for a reasonable price.  I couldn't believe how much larger the room looked after installing these floor-to-ceiling, wall-to-wall curtains from IKEA.

girls bedroom design with gray floor-to-floow wall-to-wall curtains from IKEA


4. Shelves

I cannot take any credit for this one.  My BF was set on the floating shelves while I was leaning towards some sort of shelving unit. I have to say I love the way these turned out.  We mounted a new TV (we were able to pick up the display TV at Sears just after the new models came out) and had to have an electrician come out and help hide those cords.

girls bedroom with black floating shelves from IKEA


5. Furniture

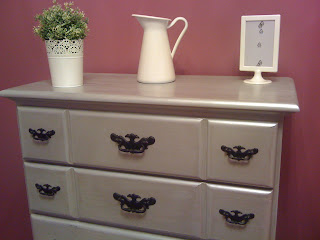
The dresser:  I knew her current dresser could be saved and given a fabulous makeover to fit in the new room. See the before and pics. Check out the refinished dresser project.

girls painted, glazed, distressed wood dresser - metallic silver finish


The bed:

Antique twin bed distressed, shabby chic, refinished with Annie Sloan Chalk Paint - Old WhiteI had looked around some furniture stores and was getting nervous that I wouldn't be able to find a bed within my budget that would fit into the new room. I was about to suck it up and buy a sleigh style bed that was much higher than I wanted to spend. Fortunately, I live nearby several antique furniture stores and while browsing for decorative accessories, I found it!! If you're ever in Leesburg you have to check out The Cottage.

It was rough around the edges. Someone had already tried to give it a make over, but the shabby chic bed was was waaaay to SHABBY for a girls bedroom.  So I took on my first Annie Sloan Chalk Paint furniture refinishing project. Check out the too shabby chic antique bed makeover

I LOVED the finished project.

Antique twin bed distressed, shabby chic, refinished with Annie Sloan Chalk Paint - Old White


And most importantly..... so did she!

When she finally came home I set up a video camera in her room and we had a TV worthy "grand reveal." It was great. She absolutely loved it and is still so excited to have friends over to show off her room. She brags about how cool it is. And she even takes extra effort to make sure her bed is always made and the floors are kept cleaned up.

It was so much fun to do this for her. I couldn't wait to start the next bedroom makeover for my six year old.


Sunday, March 24, 2013

The glam girl's room - the bed

As part of the new room makeover I knew we would be buying a new bed.

My daughter had a loft bunk bed before we moved into the new house.  She chose to sleep on her twin mattress on the floor rather than moving her bunk bed into the new room -- nothing makes you feel like a good parent like having your kid sleep on a mattress on the floor :-)

We quickly got her a new box spring and a bed frame, but we had to find just the right bed for the room.  I searched local furniture stores and online sites trying to find the right bed -- and one that was in my budget.

Then, while we were out browsing some local antique stores for decorating ideas and accessories (I'm fortunate to live in an area where there are several nearby), I found it!  It was sitting on the front porch of The Cottage.

The antique bed had already been painted and distressed, but it was a little too shabby -
some of the paint starting peeling off (when I picked and peeled at it :-)


Someone had already tried to give it a Shabby Chic finish but it was waaaay to shabby for a girls bedroom - also, while the color was nice, it didn't fit into our color scheme.  I decided I would refinish the bed to give it a more girly, less shabby, shabby chic finish.
 

So, I started my first Annie Sloan Chalk Paint project using Old White paint.

My youngest daughter and
good friend Melissa -- All pitching it :-)


I loved how smooth the Annie Sloan Chalk Paint went on and how smoothly and easily is sanded down while distressing.


I finished the bed with a coat of clear furniture wax.  I decided not to buy the Annie Sloan wax, but on all my projects since this one have used only Annie Sloan Wax. The others seem to have a slightly yellow tint and change the beautiful color of the 'Old White' paint.

Stay tuned for the posting with the completed bed and the finished Glam Girl Room Makeover.

The glam girl's room - the chandelier

Is it possible to have a super glam girls room without a chandelier?

I wasn't sure what I was going to do about lighting until I came across this ultra-fabulous chandelier on my favorite online garage sale - I wasn't even looking for this, but once I saw it I was inspired!

The arms look kind of crooked in this pic, but where they connect
they could twist a bit -- a slight adjustment and it was totally straight.

My favorite part about this chandelier (besides the multi-tiered lighting and the beautiful shades) is that it was used to light the tent during the reception of a civil ceremony. Although I don't know where it first came from, it has more history than something straight off the shelves of a hardware super store.  I like that it has a happy past :-)

It needed just a few minor adjustments to make it fit in with the new room decor. For one, the brass would not match all the gray and silver accents. So, I decided to paint all the brass on the chandelier. I decided on Rust-Oleum Metallic Satin Nickel Spray Paint.

Once it dried, we called the electrician to mount it -- in the new house there wasn't lighting pre-installed in the bedroom ceilings, otherwise we would have hung it ourselves.  One thing I highly recommend is to go with a dimmer switch -- when on at full brightness the light is very bright and kicks off some serious heat.

I bought the decorative surround to mount with the chandelier. I thought it would add a nice touch. If I had it to do over I might have painted the surround - sometime I think you can look and tell it's plastic, but overall I'm pretty happy with it.


Now, about those shades..... I knew I did not want to leave them the ivory color but I wasn't sure what I could do with them.  I considered buying new shades, but at $5-10 each that would have added significantly to my budget.  I was going to try and paint them. 

I had never painted fabric before and I wasn't sure what to do that wouldn't mess them up - I was afraid painting them would leave them with a hard, plastic look.  And if I messed one up I was sc$%^$^ed -- I didn't have any 'spares'.

So I researched what others had done.  I thought maybe acrylic craft paint; I saw that on one of the blogs, but realized that it was a much different chandelier shade they refinished - the ones I had were fabric on the inside and out.

I decided to go for it with some flat black spray paint. I laid them all out on a sheet of cardboard and started at it.  I was sooo pleasantly surprised! The paint went on nicely -- the key was doing VERY light coats of paint. I think I did 2-3 coats, but very light each time. The finished product was not stiff or plastic looking at all.


I LOVE the way this turned out. I especially love the way the shades cast the light -- it is such a romantic feeling and adds so much to the charm of the room. 

This turned out to be one of the highlights of the room, and everyone that sees it oohs and aahs.